Android Cuttlefish Virtual Device Launch Automation: A Step by Step Guide
Contents
Cuttlefish Introduction
What is Android Cuttlefish?
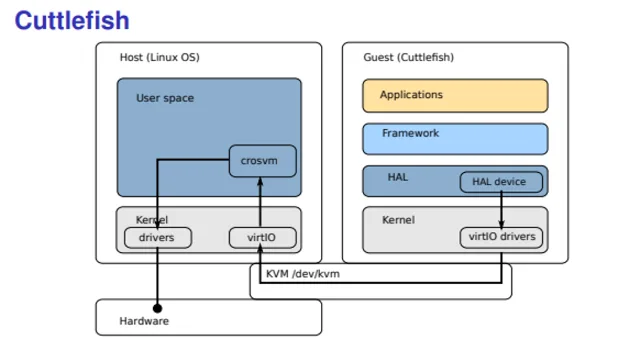
Android Cuttlefish is an open-source Android Virtual Device (AVD) developed by Google. Its purpose is to run Android as a virtual machine on Linux-based systems for testing and development purposes. It leverages QEMU, a popular open-source emulator, and KVM, a hardware-assisted virtualization technology, to enable efficient virtualization and emulation of Android devices. This allows developers, researchers, and testers to work with AOSP without having access to a physical device.
- Android Cuttlefish Documentation: https://source.android.com/docs/setup/create/cuttlefish
- Github Link: https://github.com/google/android-cuttlefish
- Cuttlefish Introduction Slide: https://2net.co.uk/slides/aosp-aaos-meetup/2022-march-cuttlefish.pdf
Why we need Android Cuttlefish?
One important feature of Android Cuttlefish is its full fidelity with the Android framework. This means that Cuttlefish responds to your interactions just like a physical phone with the same or modified Android OS source. In other words, Android Cuttlefish is designed for Android OS or Android Kernel hackers. On the other hand, the Android emulator commonly seen in Android studio is optimized for Android application development, with many functional hooks to appeal to the use cases of Android app developers. It is not suitable for OS developers.
Cuttlefish Setup Guide - Automation
Step 0: Prerequisites
- Ubuntu 22.04.1: the following installation instructions have been tested on the Ubuntu Linux distribution with version 22.04.1. It is encouraged to use the same environment.
- Cuttlefish Launch Automation Github Repo: provides shell scripts to automate the Android Cuttlefish launch. It also includes a Makefile to make the interaction with Cuttlefish easier by encapsulating android cuttlefish commands.
Step 1: On Linux desktop, clone this repository and navigate to the android-cuttlefish-automation folder at the root level of the repository. Then, run the shell script.
git clone https://github.com/MichaelXi3/android-cuttlefish-automation.git
source ./create-android-cuttlefish.shNote: During Step 2 of the process, your laptop will reboot. Once the reboot is complete, simply execute the shell script again. The progress of shell scripts will be tracked, and previously completed commands will not be re-run. The reason for the reboot is to trigger the installation of additional kernel modules and the application of udev rules for android cuttlefish.
Step 2: Interact with Android Cuttlefish using Makefile
After executing the shell script, you should be located in the ~android-cuttlefish/cf directory. The script also copied a Makefile to this directory to help you interact with the Android Cuttlefish virtual device. The commands are described as follows:
make shell                  # enter the shell of Android Cuttlefish
make root                   # running as root
make stop                   # stop the cuttlefish device
HOME=$PWD ./bin/launch_cvd  # launch a new cuttlefish virtual device
You also can add additional commands into this Makefile to make the interaction with android cuttlefish more straightforward.
Cuttlefish Setup Guide - Manual
For lastest manual launch instructions, check: https://android.googlesource.com/device/google/cuttlefish/
Step 1: In Linux desktop or virtual machine, make sure virtualization with KVM is available
grep -c -w "vmx\|svm" /proc/cpuinfoThis should return a non-zero value. If running on a cloud machine, this may take cloud-vendor-specific steps to enable.
Step 2: Download, build, and install the cuttlefish host debian packages
sudo apt install -y git devscripts config-package-dev debhelper-compat golang curl
git clone https://github.com/google/android-cuttlefish
cd android-cuttlefish
for dir in base frontend; do
  cd $dir
  debuild -i -us -uc -b -d
  cd ..
done
sudo dpkg -i ./cuttlefish-base_*_*64.deb || sudo apt-get install -f
sudo dpkg -i ./cuttlefish-user_*_*64.deb || sudo apt-get install -f
sudo usermod -aG kvm,cvdnetwork,render $USER
sudo reboot
This script installs the Android Cuttlefish environment on a Linux-based system.
Step 3: Download OTA images and host package of Android Cuttlefish
- OTA (Over-The-Air) image: this file is a system image for the Cuttlefish Virtual Device (CVD), which is a part of AOSP.
- Host package: this file is a host package for Cuttlefish. It includes binaries and scripts that need to be run on the host machine to set up and run the Cuttlefish virtual device.
- Go to http://ci.android.com/
- Enter a branch name. Start with
aosp-masterif you don‘t know what you’re looking for - Navigate to
aosp_cf_x86_64_phoneand click onuserdebugfor the latest build - Click on
Artifacts - Scroll down to the OTA images. These packages look like
aosp_cf_x86_64_phone-img-xxxxxx.zip– it will always haveimgin the name. Download this file - Scroll down to
cvd-host_package.tar.gz. You should always download a host package from the same build as your images - On your local system,
cd /path/to/android-cuttlefish, combine the packages with following codemkdir cf cd cf tar xvf /path/to/cvd-host_package.tar.gz unzip /path/to/aosp_cf_x86_64_phone-img-xxxxxx.zip
Step 4: Launch cuttlefish and other useful cuttlefish commands
-
Launch cuttlefish virtual machine
HOME=$PWD ./bin/launch_cvd# launch in daemon mode and set disk, ram, and cpu HOME=${PWD} ./bin/launch_cvd -daemon -memory_mb 27000 -data_policy always_create -blank_data_image_mb 30000 -cpus 1 -
Enable cuttlefish root
./bin/adb root -
Launch cuttlefish shell
./bin/adb shell -
Stop cuttlefish virtual machine
pkill run_cvd
Reference and Useful Info
-
Google Cuttlefish Documentation: Link
-
Cheat sheet of cuttlefish
launch_cvd-start_vnc_server Start VNC server on port 6444 -start_webrtc Start web UI on https://localhost:8443 -console=true Start console interface cuttlefish_runtime/console -daemon Daemon mode (run as a background process) -pause-in-bootloader=true Access bootloader via serial console -x_res screen width -y_res screen height -dpi screen resolution -guest_enforce_security=false SELinux in permissive mode -extra_kernel_cmdline “” additional Linux command line -cpus Number of CPUs to emulate -memory_mb amount of memory to give to device -noresume Start a new runtime: factory reset -
Virtual Machine in Android: Everything you need to know: Link